Add a balloon
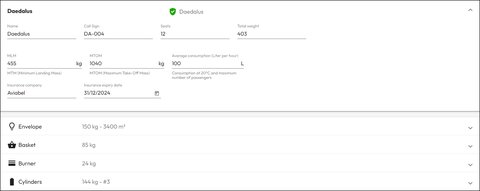
This documentation guides users on adding balloons to their inventory in Quick Release, including specifying various details such as name, callsign, number of seats, and insurance information.
Feature location
This feature can be accessed within the Quick Release software by navigating to the following path:
- Login to your Quick Release account.
- Go to the “Resources” section.
- Select “Balloons” from the dropdown menu.
- Click on “ADD BALLOON” to access the feature.
Important: It’s easier to add all your cylinders first, then your balloon. Cylinders can be used on several balloons.
Add Balloon
To add a balloon to your inventory in Quick Release, follow these steps:
Balloon Details
- Name: Specify the name of the balloon.
- Call Sign: Enter the call sign for the balloon.
- Number of Seats: Input the total number of seats available in the balloon. Overbooking will be allowed in the system.
- MTM (Minimum Landing Mass): (optional) Provide the minimum landing mass of the balloon.
- MTOM (Maximum Take Off Mass): (optional) Specify the maximum take-off mass of the balloon.
- Average Consumption: (optional) Enter the average consumption details.
- Insurance Company: (optional) Input the insurance company providing coverage for the balloon.
- Insurance Date: Specify the date of insurance. The system will provide warnings if the insurance date is nearing expiration or has already expired.
Envelope Details
- Manufacturer: (optional) Enter the manufacturer of the envelope.
- Type: (optional) Specify the type of envelope.
- Weight: Provide the weight of the envelope.
- Temperature: Enter the temperature, used in lift calculation.
- Group and Volume: Specify the group and volume details.
- Hours and Inspection Valid Until Date: Provide the hours and the date until which inspection is valid.
Basket Details
- Manufacturer: Enter the manufacturer of the basket.
- Type: Specify the type of basket.
- Weight: Provide the weight of the basket.
Burner Details
- Manufacturer: Enter the manufacturer of the burner.
- Type: Specify the type of burner.
- Weight: Provide the weight of the burner.
Cylinders
- Add cylinders to the balloon.
Note: It’s recommended to save the balloon first before adding cylinders.
Once all necessary information is provided, the balloon can be saved.
Update a balloon
In Quick Release, it’s essential for users to understand that modifications made to a balloon’s details will only impact upcoming flights, not historical ones. This distinction ensures clarity and accuracy in flight records and planning. Here’s an explanation of this concept:
When users update or modify a balloon’s information, such as its specifications, insurance details, or inspection dates, these changes will only apply to future flights scheduled after the modification. Historical flights, which have already occurred, remain unchanged and retain the balloon’s details as they were at the time of the flight.
Lift Calculation Considerations
Important Reminder: Follow Manufacturer Guidelines
When adding equipment to Quick Release, always refer to the manufacturer’s documentation, user manuals, or any provided instructions to ensure that you input accurate information and use the equipment correctly.
Required fields
To be able to properly calculate the lift available, we need the total weight, the volume and the maximum temperature of the balllon. You will need to configure correctly the following fields:
Envelope Details
- Weight: Provide the weight of the envelope.
- Temperature: Enter the temperature, used in lift calculation.
- Group and Volume: Specify the group and volume details.
Basket, Burner and Cylinder Details
- Weight: Provide the weight
Example
